cross

cross

1

2

3

4

Sunday, October 21, 2018

တကၠသိုလ္သာ ပို႔လိုက္ပါေတာ့ ဆရာမ

သံုးတန္းေက်ာင္းသားက
ဆရာမကို လာေျပာတယ္။
" က်ေနာ္က ...
က်ေနာ့ညီမထက္ ေတာ္တယ္။
သူကေတာ့ ေလးတန္းမွာ"
ဒီလို ....
ဒီလိုနဲ႔....
အျမဲေျပာေနေတာ့
ဆရာမ က...
သူ႔ကို .....
ေက်ာင္းအုပ္ ဆရာႀကီးဆီ
ေခၚသြားခဲ့တယ္။
ေက်ာင္းအုပ္ဆရာႀကီးက
ေလးတန္းစာ....
စစ္ၾကည့္မယ္လို႔
ဆံုးျဖတ္ခ်က္ခ်လိုက္တယ္။

" ၃ + ၃"
" ၆ "
" ၆+၆ "
"၁၂ "
....... ?
(------ )
....... !
( ------ )
........ ?
( ------- )
....... ?
(------ )
....... !
( ------ )
........ ?
( ------- )
....... ?
(------ )
....... !
( ------ )
........ ?
( ------- )
....... ?
(------ )
....... !
( ------ )
........ ?
( ------- )
ဆရာႀကီးေမးတာ
ေက်ာင္းသားက ...
အားလံုး မွန္ေအာင္ေျဖႏိုင္တယ္။
ေက်ာင္းအုပ္ဆရာႀကီးက
ဒီေက်ာင္းသားေလးကို
ေလးတန္း ခ်က္ျခင္းပို႔ခိုင္းတယ္။
ဆရာမက .....
ထပ္စစ္ခ်င္တယ္
ေျပာေတာ့
ဆရာႀကီးက
ခြင့္ျပဳလိုက္တယ္"
" ႏြားမွာ ေလး လူမွာႏွစ္ ဒါဘာလဲ... ? "
" ေျခေထာက္ပါ ဆရာမ"
" C နဲ႔ စၿပီး T နဲ႔ဆံုးမယ္။
အဲဒီအရာက အေမြးထူၿပီး
လံုးလံုးေလး ေနတယ္.....
အရသာေကာင္းတယ္။
ေနာက္ .....
ျဖဴျဖဴၾကည္ၾကည္
အရည္ပါတယ္
ဘာလဲ... ? "
" Coconut အုန္းသီးေလ ဆရာမ"
" ဝင္သြားတုန္းက မာမာေလး။
ထြက္လာေတာ့ ေပ်ာ့ၿပီး
ေစးကပ္ကပ္ျဖစ္ေနတာက"
ဆရာမရဲ႕...
ေမးခြန္းၾကားၿပီး
ဆရာႀကီး .....
မ်က္လံုးေတြ ျပဴးသြားတယ္။
ေက်ာင္းသား ေျဖမိမွာစိုးလို႔
တားမလို႔ လုပ္တုန္း
ေျဖလိုက္ၿပီ။
" ပီေက"
"ငါ့အထဲမွာ ...
အေခ်ာင္းေတြစိုက္တယ္။
ငါ မရပ္ႏိုင္ခင္
လွဲၿပီးႀကိဳးခ်ည္တယ္။
အဲဒီမတိုင္ခင္
ငါက စိုစြတ္ေနတယ္"
" ရြက္ဖ်င္တဲ"
ဆရာႀကီး ....
ဂနာမၿငိမ္ ျဖစ္လာတယ္။
"လက္ေခ်ာင္း တေခ်ာင္း
ငါ့ အထဲဝင္သြားတယ္။
မင္း ပ်င္းလာရင္
ငါ့ကို ပြတ္ကလိတယ္။
ဒါ ဘာလဲ... ? "
" လက္စြပ္"
"ငါ့မွာ .....
မာမာေတာင့္ေတာင့္
အေခ်ာင္း တေခ်ာင္း႐ွိတယ္။
ထိပ္က .....
ထိုးေဖာက္ဝင္ေရာက္ႏိုင္တယ္။
တုန္တုန္ခါၿပီး သြားတယ္။
အဲဒါ ဘာလဲ... ? "
" မွ်ားတံ"
အိုး မိုင္ေဂါ့ဒ္..
ဆရာႀကီး ေရရြတ္မိတယ္။
"F စကားလံုးနဲ႔ စတယ္။
K နဲ႔ဆံုးတယ္။
ဒါမ႐ွိရင္
လက္ကို သံုးရမယ္။
အဲဒါဘာလဲ.... ? "
" Fork ခက္ရင္းခြပါ ဆရာမ"
"ေယာက်္ားတိုင္းမွာ ႐ွိတယ္။
အဲဒါက....
အ႐ုိးမပါ ႂကြက္သားခ်ည္း။
ေသြးေၾကာေတြ
အမ်ားႀကီးနဲ႔
ေရႊဖယံုသီးလိုေနတယ္။
ခ်စ္မႈေရးရာမွာ သံုးတယ္
အဲဒါ ဘာလဲ.... ? "
"ႏွလံုး"
"ဟင္းးးးးး...အင္းအင္း"
ဆရာႀကီး ...
သက္ျပင္းေတြ ....
အခါခါခ်တယ္။
ၿပီးေနာက္...
ဆရာမကို ၾကည့္ကာ
ေျပာလိုက္ေလ၏။
" ဒီေကာင့္ကို .....
တကၠသိုလ္သာ
တန္းပို႔လိုက္ေတာ့။
ဆရာမေမးခြန္းေတြကို
က်ေနာ္ ေျဖရင္ေတာင္
အားလံုး မမွန္ႏိုင္ဘူး"

. 😛. 😛. 😛
=================================

TZO
Teacher jokes
Credit to original writer
Share by Hades
#pollenboy Via , ပန္းပြင့္
Via:U MinHtike


Tuesday, October 16, 2018

Download i Theme 5.1 apk for VIVO smart phones.

 Download it from below links.

Download Link (1) 

 Download Link (2) 


Sunday, October 14, 2018

How to Apply Rohingya font in Oppo || How To Change Fonts in Oppo

Assala Mu Alikum. Hello guys, Welcome to my website. This is a step by step guide  to apply Rohingya(Hanifi) Fonts in Oppo devices.

For Example :

If you are an owner of Oppo F5 you already know that there is no option to change fonts in Oppo F5. But after a lots of research, I have found a way to change fonts in Oppo F5. You need to install the Chinese '' Theme Store.apk '' to change fonts. Don’t worry I will provide you step by step guide to change fonts.

Step 1: Download the required app from below link.

 Download Link (1) Drive

 Download Link (2)

Download Link (3)

 Download Link (4) 


Step 2: Your File Will be Downloaded in Downloads Folder. Open-File Manager & Install The Theme Store.apk.

Step 3: Now Clear The Theme Store Data by Going To This Location  > Setting > App Management > Installed > Theme Store > Clear Data

Step 4: Now Open The Theme Store. Just Tap on The Bottom Text. Which is Also Shown in Below Image.


Step 5: Now Tap on The avater.


Step 6: Now Tap on The ''Aa'' button as you can see on my screenshot. It will show you your downloaded fonts.

Step 7 : Tap on ''Rohingya Final (iFont)"

Step 8 : Now tap on the button which you can see at the bottom of the picture.


Congratulation :

You have successfully applied ''Rohingya Hanufi font'' on your OPPO device.

Sunday, September 16, 2018

THE CROW AND THE WREN


THE Crow once caught the Wren, and said to her, "I will eat you now. ' The Wren wailed to herself "oh, my little daughter, my little daughter, who will look after you when I am dead?" The Crow thought to himself, "This Wren is old and tough, but her daughter will be young and soft, 'and so he suggested to the Wren, I will let you go if you will promise to give me your daughter to eat on the seventh day from now.' The Wren promised and the Crow let her go.


On the seventh day, the Crow came to the Wren asked for her daughter.


 "You eat all sorts of rubbish," said the Wren your beak is dirty. My daughter is clean and sweet, and unless you wash your mouth in front of me, I cannot put my daughter in your beak.


"All right," replied the Crow, "I will come back. with some water. ' Then he flew away.


 The Crow went to the Water, and said:


 "Water, Water, come with me,


To wash the Beak,


To eat the little Wren.’


The Water replied, "How can you take me away without a pot? So, go and get a pot first."


 "All right," said the Crow, and flew away.


 The Crow then went to the Pot and said:


Pot, Pot, come with me,


To fetch the Water,


To wash the Beak,


To eat the little Wren.'


 "I am willing to come replied the Pot, but I have a hole in my side. So please go and fetch some mud to fill up the hole.'


 "All right, 'said the Crow, and flew away. The Crow then went to the Mud and said:


"Mud, Mud, come with me,


 To mend the Pot,


 To fetch the Water,


 To wash the Beak,


 To eat the little Wren. '


 "I am willing to come replied the Mud," but I am too hard to mend the Pot. So please ask some buffalo to come and wallow here.


"All right," said the Crow, and flew away. The Crow then went to the Buffalo and said:


Buffalo, Buffalo, come with me,


 To wallow the Mud,


To mend the Pot To fetch the Water,


 To wash the Beak,


To eat the little Wren.'


 "I am willing to come replied the Buffalo," but I am too weak with hunger to wallow. Please get me some grass to eat. "


"All right, 'said the Crow, and flew away. The Crow then went to the Grass and said:


" Grass, Grass, come with me,


 To feed the Buffalo,


 To wallow the Mud,


 To mend the Pot,


To fetch the Water,


 To wash the Beak,


 To eat the little Wren. '


 "I am willing to come replied the Grass, but the Buffalo is such a big eater, and he needs more of me. If you can give me some fresh land, I will grow more until there is enough of me for the Buffalo."


 "All right, 'said the Crow, and flew away. The Crow then went to the Land and said:


 Land, Land, come with me,


 To grow the Grass,


To feed the Buffalo,


 To wallow the Mud,


 To mend the Pot,


To fetch the Water,


To wash the Beak,


To eat the little Wren, "


" I am willing to come replied the Land, "but, you see, I am covered with forest. How can the Grass grow on me, unless the forest is cleared? '


 "All right," said the Crow, and flew away. The Crow then went to the Forest and said:


Forest, Forest, go away,


 To clear the Land,


 To grow the Grass,


To feed the Buffalo,


 To wallow the Mud,


To mend the Pot,


To fetch the Water,


 To wash the Beak,


 To eat the little Wren. '


 "I am willing to go away," replied the Forest, "but I cannot move, as the roots of my trees are stuck in the ground. If you will please fetch a fire, and bum me up, the Land will be cleared".


 All right, "said the Crow, and flew away. The Crow then went to the Fire and said:"


Fire, Fire, come with me,


 To burn the Forest,


To clear the Land,


 To grow the Grass,


 To feed the Buffalo,


 To wallow the Mud,


To mend the Pot,


 To fetch the Water,


 To wash the Beak,


 To eat the little Wren.’


"I will come replied the Fire. The Crow in great joy flew back towards the Forest with the Fire in his beak, but before he could reach it, his beak had become so badly burned that he had to drop the Fire. Giving up all hope of eating the little Wren, the Crow flew home in disgust.


Friday, August 17, 2018

Android - Image Effects

Android allows you to manipulate images by adding different kinds of effects on the images. You can easily apply image processing techniques to add certain kinds of effects on images. The effects could be brightness,darkness, grayscale conversion e.t.c.
Android provides Bitmap class to handle images. This can be found under android.graphics.bitmap. There are many ways through which you can instantiate bitmap. We are creating a bitmap of image from the imageView.
private Bitmap bmp;
private ImageView img;
img = (ImageView)findViewById(R.id.imageView1);
BitmapDrawable  abmp = (BitmapDrawable)img.getDrawable();
Now we will create bitmap by calling getBitmap() function of BitmapDrawable class. Its syntax is given below −
bmp = abmp.getBitmap();
An image is nothing but a two dimensional matrix. Same way you will handle a bitmap. An image consist of pixels. So you will get pixels from this bitmap and apply processing to it. Its syntax is as follows −
for(int i=0; i<bmp.getWidth(); i++){
   for(int j=0; j<bmp.getHeight(); j++){
      int p = bmp.getPixel(i, j);
   }
}
The getWidth() and getHeight() functions returns the height and width of the matrix. The getPixel() method returns the pixel at the specified index. Once you got the pixel, you can easily manipulate it according to your needs.
Apart from these methods, there are other methods that helps us manipulate images more better.
Sr.NoMethod & description
1
copy(Bitmap.Config config, boolean isMutable)
This method copy this bitmap's pixels into the new bitmap
2
createBitmap(DisplayMetrics display, int width, int height, Bitmap.Config config)
Returns a mutable bitmap with the specified width and height
3
createBitmap(int width, int height, Bitmap.Config config)
Returns a mutable bitmap with the specified width and height
4
createBitmap(Bitmap src)
Returns an immutable bitmap from the source bitmap
5
extractAlpha()
Returns a new bitmap that captures the alpha values of the original
6
getConfig()
This mehtod eturn that config, otherwise return null
7
getDensity()
Returns the density for this bitmap
8
getRowBytes()
Return the number of bytes between rows in the bitmap's pixels
9
setPixel(int x, int y, int color)
Write the specified Color into the bitmap (assuming it is mutable) at the x,y coordinate
10
setDensity(int density)
This method specifies the density for this bitmap

Example

The below example demonstrates some of the image effects on the bitmap. It crates a basic application that allows you to convert the picture into grayscale and much more.
To experiment with this example , you need to run this on an actual device.
StepsDescription
1You will use Android studio to create an Android application under a package com.example.sairamkrishna.myapplication.
2Modify src/MainActivity.java file to add necessary code.
3Modify the res/layout/activity_main to add respective XML components
4Run the application and choose a running android device and install the application on it and verify the results
Following is the content of the modified MainActivity.java.
package com.example.sairamkrishna.myapplication;

import android.graphics.Bitmap;
import android.graphics.Color;
import android.graphics.drawable.BitmapDrawable;
import android.support.v7.app.ActionBarActivity;

import android.os.Bundle;
import android.view.View;
import android.widget.Button;
import android.widget.ImageView;

public class MainActivity extends ActionBarActivity {
   Button b1, b2, b3;
   ImageView im;
   
   private Bitmap bmp;
   private Bitmap operation;
   
   @Override
   protected void onCreate(Bundle savedInstanceState) {
      super.onCreate(savedInstanceState);
      setContentView(R.layout.activity_main);
      
      b1 = (Button) findViewById(R.id.button);
      b2 = (Button) findViewById(R.id.button2);
      b3 = (Button) findViewById(R.id.button3);
      im = (ImageView) findViewById(R.id.imageView);
      
      BitmapDrawable abmp = (BitmapDrawable) im.getDrawable();
      bmp = abmp.getBitmap();
   }
   
   public void gray(View view) {
      operation = Bitmap.createBitmap(bmp.getWidth(),bmp.getHeight(), bmp.getConfig());
      double red = 0.33;
      double green = 0.59;
      double blue = 0.11;
      
      for (int i = 0; i < bmp.getWidth(); i++) {
         for (int j = 0; j < bmp.getHeight(); j++) {
            int p = bmp.getPixel(i, j);
            int r = Color.red(p);
            int g = Color.green(p);
            int b = Color.blue(p);
            
            r = (int) red * r;
            g = (int) green * g;
            b = (int) blue * b;
            operation.setPixel(i, j, Color.argb(Color.alpha(p), r, g, b));
         }
      }
      im.setImageBitmap(operation);
   }
   
   public void bright(View view){
      operation= Bitmap.createBitmap(bmp.getWidth(), bmp.getHeight(),bmp.getConfig());
      
      for(int i=0; i<bmp.getWidth(); i++){
         for(int j=0; j<bmp.getHeight(); j++){
            int p = bmp.getPixel(i, j);
            int r = Color.red(p);
            int g = Color.green(p);
            int b = Color.blue(p);
            int alpha = Color.alpha(p);
            
            r = 100  +  r;
            g = 100  + g;
            b = 100  + b;
            alpha = 100 + alpha;
            operation.setPixel(i, j, Color.argb(alpha, r, g, b));
         }
      }
      im.setImageBitmap(operation);
   }
   
   public void dark(View view){
      operation= Bitmap.createBitmap(bmp.getWidth(),bmp.getHeight(),bmp.getConfig());
      
      for(int i=0; i<bmp.getWidth(); i++){
         for(int j=0; j<bmp.getHeight(); j++){
            int p = bmp.getPixel(i, j);
            int r = Color.red(p);
            int g = Color.green(p);
            int b = Color.blue(p);
            int alpha = Color.alpha(p);
            
            r =  r - 50;
            g =  g - 50;
            b =  b - 50;
            alpha = alpha -50;
            operation.setPixel(i, j, Color.argb(Color.alpha(p), r, g, b));
         }
      }
      im.setImageBitmap(operation);
   }
   
   public void gama(View view) {
      operation = Bitmap.createBitmap(bmp.getWidth(),bmp.getHeight(),bmp.getConfig());
      
      for(int i=0; i<bmp.getWidth(); i++){
         for(int j=0; j<bmp.getHeight(); j++){
            int p = bmp.getPixel(i, j);
            int r = Color.red(p);
            int g = Color.green(p);
            int b = Color.blue(p);
            int alpha = Color.alpha(p);
            
            r =  r + 150;
            g =  0;
            b =  0;
            alpha = 0;
            operation.setPixel(i, j, Color.argb(Color.alpha(p), r, g, b));
         }
      }
      im.setImageBitmap(operation);
   }
   
   public void green(View view){
      operation = Bitmap.createBitmap(bmp.getWidth(),bmp.getHeight(), bmp.getConfig());
      
      for(int i=0; <bmp.getWidth(); i++){
         for(int j=0; j<bmp.getHeight(); j++){
            int p = bmp.getPixel(i, j);
            int r = Color.red(p);
            int g = Color.green(p);
            int b = Color.blue(p);
            int alpha = Color.alpha(p);
            
            r =  0;
            g =  g+150;
            b =  0;
            alpha = 0;
            operation.setPixel(i, j, Color.argb(Color.alpha(p), r, g, b));
         }
      }
      im.setImageBitmap(operation);
   }
   
   public void blue(View view){
      operation = Bitmap.createBitmap(bmp.getWidth(),bmp.getHeight(), bmp.getConfig());
      
      for(int i=0; i<bmp.getWidth(); i++){
         for(int j=0; j<bmp.getHeight(); j++){
            int p = bmp.getPixel(i, j);
            int r = Color.red(p);
            int g = Color.green(p);
            int b = Color.blue(p);
            int alpha = Color.alpha(p);
            
            r =  0;
            g =  0;
            b =  b+150;
            alpha = 0;
            operation.setPixel(i, j, Color.argb(Color.alpha(p), r, g, b));
         }
      }
      im.setImageBitmap(operation);
   }
}
Following is the modified content of the xml res/layout/activity_main.xml.
Here abc indicates about logo of tutorialspoint.com
<?xml version="1.0" encoding="utf-8"?>
<RelativeLayout xmlns:android="http://schemas.android.com/apk/res/android"
   xmlns:tools="http://schemas.android.com/tools" 
   android:layout_width="match_parent"
   android:layout_height="match_parent" 
   android:paddingLeft="@dimen/activity_horizontal_margin"
   android:paddingRight="@dimen/activity_horizontal_margin"
   android:paddingTop="@dimen/activity_vertical_margin"
   android:paddingBottom="@dimen/activity_vertical_margin" tools:context=".MainActivity">
   
   <TextView
      android:layout_width="wrap_content"
      android:layout_height="wrap_content"
      android:id="@+id/textView"
      android:layout_alignParentTop="true"
      android:layout_centerHorizontal="true"
      android:textSize="30dp"
      android:text="Image Effects" />
      
   <TextView
      android:layout_width="wrap_content"
      android:layout_height="wrap_content"
      android:text="Tutorials Point"
      android:id="@+id/textView2"
      android:layout_below="@+id/textView"
      android:layout_centerHorizontal="true"
      android:textSize="35dp"
      android:textColor="#ff16ff01" />
      
   <ImageView
      android:layout_width="wrap_content"
      android:layout_height="wrap_content"
      android:id="@+id/imageView"
      android:layout_below="@+id/textView2"
      android:layout_centerHorizontal="true"
      android:src="@drawable/abc"/>
   
   <Button
      android:layout_width="wrap_content"
      android:layout_height="wrap_content"
      android:text="Gray"
      android:onClick="gray"
      android:id="@+id/button"
      android:layout_alignParentBottom="true"
      android:layout_alignParentLeft="true"
      android:layout_alignParentStart="true"
      android:layout_marginBottom="97dp" />
      
   <Button
      android:layout_width="wrap_content"
      android:layout_height="wrap_content"
      android:text="dark"
      android:onClick="dark"
      android:id="@+id/button2"
      android:layout_alignBottom="@+id/button"
      android:layout_alignParentRight="true"
      android:layout_alignParentEnd="true" />
      
   <Button
      android:layout_width="wrap_content"
      android:layout_height="wrap_content"
      android:text="Bright"
      android:onClick="bright"
      android:id="@+id/button3"
      android:layout_alignTop="@+id/button2"
      android:layout_centerHorizontal="true" />
      
   <Button
      android:layout_width="wrap_content"
      android:layout_height="wrap_content"
      android:text="Red"
      android:onClick="gama"
      android:id="@+id/button4"
      android:layout_below="@+id/button3"
      android:layout_alignParentLeft="true"
      android:layout_alignParentStart="true" />
      
   <Button
      android:layout_width="wrap_content"
      android:layout_height="wrap_content"
      android:text="Green"
      android:onClick="green"
      android:id="@+id/button5"
      android:layout_alignTop="@+id/button4"
      android:layout_alignLeft="@+id/button3"
      android:layout_alignStart="@+id/button3" />
      
   <Button
      android:layout_width="wrap_content"
      android:layout_height="wrap_content"
      android:text="blue"
      android:onClick="blue"
      android:id="@+id/button6"
      android:layout_below="@+id/button2"
      android:layout_toRightOf="@+id/textView"
      android:layout_toEndOf="@+id/textView" />
      
</RelativeLayout>
Following is the content of AndroidManifest.xml file.
<?xml version="1.0" encoding="utf-8"?>
<manifest xmlns:android="http://schemas.android.com/apk/res/android"
   package="com.example.sairamkrishna.myapplication" >
   <application
      android:allowBackup="true"
      android:icon="@mipmap/ic_launcher"
      android:label="@string/app_name"
      android:theme="@style/AppTheme" >
   
      <activity
         android:name=".MainActivity"
         android:label="@string/app_name" >
      
         <intent-filter>
            <action android:name="android.intent.action.MAIN" />
            <category android:name="android.intent.category.LAUNCHER" />
         </intent-filter>
         
      </activity>
      
   </application>
</manifest>
Let's try to run our application we just modified. I assume you had created yourAVD while doing environment setup. To run the app from Android studio, open one of your project's activity files and click Run Eclipse Run Icon 
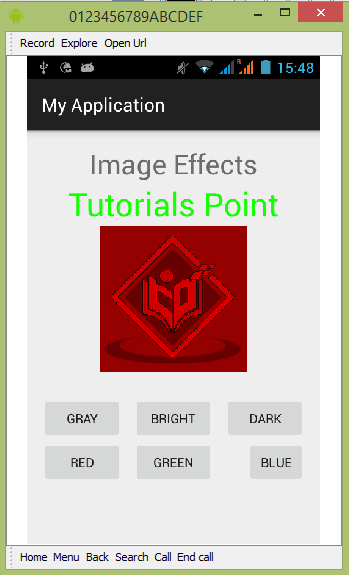
icon from the toolbar. Android studio installs the app on your AVD and starts it and if everything is fine with your setup and application, it will display following Emulator window −
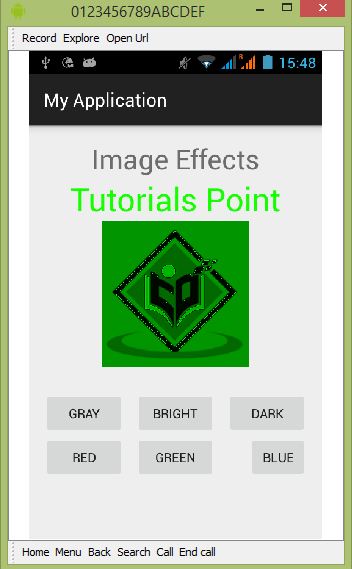
Anroid Image Effects Tutorial
Now if you will look at your device screen , you will see the an image of android along with three buttons.
Now just select the Gray button that will convert your image into grayscale and will update the UI. It is shown below −
Anroid Image Effects Tutorial
Now tap on the bright button, that will add some value to each pixel of the image and thus makes an illusion of brightness. It is shown below −
Anroid Image Effects Tutorial
Now tap on the dark button, that will subtract some value to each pixel of the image and thus makes an illusion of dark. It is shown below −
Anroid Image Effects Tutorial
Now tap on the red button, that will subtract some value to each pixel of the image and thus makes an illusion of dark. It is shown below −
Anroid Image Effects Tutorial
Now tap on the green button, that will subtract some value to each pixel of the image and thus makes an illusion of dark. It is shown below −
Anroid Image Effects Tutorial
Now tap on the blue button, that will subtract some value to each pixel of the image and thus makes an illusion of dark. It is shown below −
Anroid Image Effects Tutorial